排名算法
基于用户投票的排名算法(一):Delicious和Hacker News
基于用户投票的排名算法(二):Reddit
基于用户投票的排名算法(三):Stack Overflow
基于用户投票的排名算法(四):牛顿冷却定律
基于用户投票的排名算法(五):威尔逊区间
基于用户投票的排名算法(六):贝叶斯平均
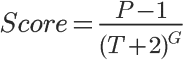
Hacker News
P:表示帖子的得票数,减去1是为了忽略发帖人的投票。
T:表示距离发帖的时间(单位为小时),加上2是为了防止最新的帖子导致分母过小(之所以选择2,可能是因为从原始文章出现在其他网站,到转贴至Hacker News,平均需要两个小时)。
G:表示”重力因子”(gravityth power),即将帖子排名往下拉的力量,默认值为1.8
结论:
得票越多,排名越高。
发帖时间越新,排名越高。或者说,帖子的排名会随着时间不断下降。(经过24小时之后,所有帖子的得分基本上都小于1)
重力因子G 数值大小决定了排名随时间下降的速度。G值越大,排名下降得越快。
缺点:用户只能投赞成票,不允许用户投反对票
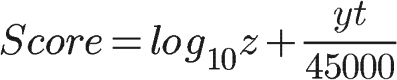
Reddit
t:帖子的新旧程度,t = 发贴时间 - 2005年12月8日7:46:43,单位为秒,用unix时间戳计算。
x:赞成票与反对票的差,x = 赞成票 - 反对票
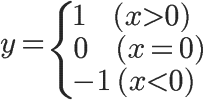
y:投票方向,y是一个符号变量,表示对文章的总体看法。如果赞成票居多,y就是+1;如果反对票居多,y就是-1;如果赞成票和反对票相等,y就是0。
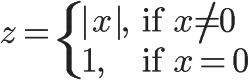
z:帖子的受肯定(否定)的程度,z表示赞成票与反对票之间差额的绝对值。如果对某个帖子的评价,越是一边倒,z就越大。如果赞成票等于反对票,z就等于1。
总结:
赞成票与反对票的差额z越大,得分越高。
差额越大,分数越不受投票影响。
帖子越新,分数越高。分数会随时间下降
缺点:不利于赞成票和反对票都比较高,但两者非常接近的情况。假定同一时间有两个帖子发表,文章A有1张赞成票(发帖人投的)、0张反对票,文章B有1000张赞成票、1000张反对票,那么A的排名会高于B。
Reddit的排名,基本上由发帖时间决定,超级受欢迎的文章会排在最前面,一般性受欢迎的文章、有争议的文章都不会很靠前。 这决定了Reddit是一个符合大众口味的社区,不是一个很激进、可以展示少数派想法的地方。
Stack Overflow
Qviews:问题的浏览次数
问题的浏览次数越多,就代表越受关注,得分也就越高。取对数的用意是当访问量越来越大,它对得分的影响将不断变小。
Qscore:问题得分
Qscore = 赞成票 - 反对票
Qanswers:回答的数量
回答的数量代表有多少人参与这个问题。这个值越大,得分将成倍放大。这里需要注意的是,如果无人回答,Qscore再高也没用,意味着再好的问题,也必须有人回答,否则进不了热点问题排行榜。
Ascores:回答得分
“回答”比”问题”更有意义。这一项的得分越高,就代表回答的质量越高。
简单加总的设计还不够全面。首先 ,一个正确的回答胜过一百个无用的回答,简单加总会导致,1个得分为100的回答与100个得分为1的回答,总得分相同。其次 ,由于得分会出现负值,因此那些特别差的回答,会拉低正确回答的得分。
Qage:距离问题发表的时间
随着时间流逝,这个值都会越变越大,导致分母增大,因此总得分会越来越小。
Qupdated:距离最后一个回答的时间
随着时间流逝,这个值都会越变越大,导致分母增大,因此总得分会越来越小。
总结
Stack Overflow热点问题的排名,与参与度 (Qviews和Qanswers)和质量 (Qscore和Ascores)成正比,与时间 (Qage和Qupdated)成反比。
分布式ID生成算法
snowflake
Twitter-Snowflake,64位自增ID算法详解
Twitter Snowflake算法详解
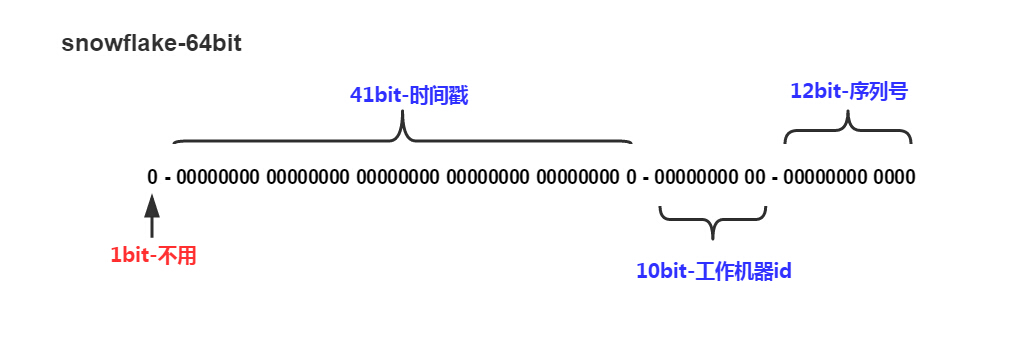
把时间戳 ,工作机器id ,序列号 组合在一起。
默认情况下 41bit 的时间戳可以支持该算法使用到 2082 年,10bit 的工作机器 id 可以支持1024台机器,序列号持 1 毫秒产生 4096 个自增序列 id。SnowFlake 的优点是,整体上按照时间自增排序,并且整个分布式系统内不会产生 ID 碰撞(由数据中心 ID 和机器 ID 作区分),并且效率较高,经测试,SnowFlake 每秒能够产生 26 万 ID 左右。
1 2 3 4 5 6 7 8 9 10 11 12 13 14 15 16 17 18 19 20 21 22 23 24 25 26 27 28 29 30 31 32 33 34 35 36 37 38 39 40 41 42 43 44 45 46 47 48 49 50 51 52 53 54 55 56 57 58 59 60 61 62 63 64 65 66 67 68 69 70 71 72 73 74 75 76 77 78 79 80 81 82 83 84 85 86 87 88 89 90 91 92 93 94 95 96 97 98 99 100 101 102 103 104 105 106 107 108 109 110 111 112 113 114 115 116 117 118 119 120 121 122 123 124 125 126 127 128 129 130 131 132 133 134 135 136 137 138 139 140 141 142 143 144 145 public class SnowflakeIdWorker private final long twepoch = 1420041600000L ; private final long workerIdBits = 5L ; private final long datacenterIdBits = 5L ; private final long maxWorkerId = -1L ^ (-1L << workerIdBits); private final long maxDatacenterId = -1L ^ (-1L << datacenterIdBits); private final long sequenceBits = 12L ; private final long workerIdShift = sequenceBits; private final long datacenterIdShift = sequenceBits + workerIdBits; private final long timestampLeftShift = sequenceBits + workerIdBits + datacenterIdBits; private final long sequenceMask = -1L ^ (-1L << sequenceBits); private long workerId; private long datacenterId; private long sequence = 0L ; private long lastTimestamp = -1L ; public SnowflakeIdWorker (long workerId, long datacenterId) if (workerId > maxWorkerId || workerId < 0 ) { throw new IllegalArgumentException(String.format("worker Id can't be greater than %d or less than 0" , maxWorkerId)); } if (datacenterId > maxDatacenterId || datacenterId < 0 ) { throw new IllegalArgumentException(String.format("datacenter Id can't be greater than %d or less than 0" , maxDatacenterId)); } this .workerId = workerId; this .datacenterId = datacenterId; } public synchronized long nextId () long timestamp = timeGen(); if (timestamp < lastTimestamp) { throw new RuntimeException( String.format("Clock moved backwards. Refusing to generate id for %d milliseconds" , lastTimestamp - timestamp)); } if (lastTimestamp == timestamp) { sequence = (sequence + 1 ) & sequenceMask; if (sequence == 0 ) { timestamp = tilNextMillis(lastTimestamp); } } else { sequence = 0L ; } lastTimestamp = timestamp; return ((timestamp - twepoch) << timestampLeftShift) | (datacenterId << datacenterIdShift) | (workerId << workerIdShift) | sequence; } protected long tilNextMillis (long lastTimestamp) long timestamp = timeGen(); while (timestamp <= lastTimestamp) { timestamp = timeGen(); } return timestamp; } protected long timeGen () return System.currentTimeMillis(); } public static void main (String[] args) SnowflakeIdWorker idWorker = new SnowflakeIdWorker(0 , 0 ); for (int i = 0 ; i < 1000 ; i++) { long id = idWorker.nextId(); System.out.println(Long.toBinaryString(id)); System.out.println(id); } } }
利用位运算计算指定位数的最大值 eg: 5 位二进制最大值为 31
1
2
3
4
5
6
7
8
9
10
11
-1L = 1111 1111 1111 1111 1111 1111 1111 1111 1111 1111 1111 1111 1111 1111 1111 1111 -1L << 5 = 1111 1111 1111 1111 1111 1111 1111 1111 1111 1111 1111 1111 1111 1111 1110 0000 -1L ^ (-1L << len) = 1111 1111 1111 1111 1111 1111 1111 1111 1111 1111 1111 1111 1111 1111 1111 1111 ^ 1111 1111 1111 1111 1111 1111 1111 1111 1111 1111 1111 1111 1111 1111 1110 0000 = 0000 0000 0000 0000 0000 0000 0000 0000 0000 0000 0000 0000 0000 0000 0001 1111 = 31(D)
签名算法 排序加密签名算法
App开放接口api安全性—Token签名sign的设计与实现
按照参数名ASCII码从小到大排序(字典序)
使用URL键值对的格式(即key1=value1&key2=value2…)拼接成字符串。
加密算法对字符串进行加密,得到签名。
1
2
3
4
5
6
7
8
9
10
11
12
13
14
15
16
17
18
19
20
21
22
23
24
25
26
27
28
29
30
31
32
33
34
35
36
37
38
39
40
41
42
43
44
45
46
47
48
49
50
51
52
53
54
55
56
57
58
59
60
61
62
63
64
65
66
67
68
69
70
71
72
73
74
import java.io.UnsupportedEncodingException;import java.net.URLEncoder;import java.security.MessageDigest;import java.security.NoSuchAlgorithmException;import java.util.Arrays;import java.util.Map;import java.util.Set;public class SignUtil public static String createSign (Map<String, String> params, boolean encode) throws UnsupportedEncodingException Set<String> keysSet = params.keySet(); Object[] keys = keysSet.toArray(); Arrays.sort(keys); StringBuffer sb = new StringBuffer(); boolean first = true ; for (Object key : keys) { if (first) { first = false ; } else { sb.append("&" ); } sb.append(key).append("=" ); Object value = params.get(key); String valueString = "" ; if (null != value) { valueString = String.valueOf(value); } if (encode) { sb.append(URLEncoder.encode(valueString, "UTF-8" )); } else { sb.append(valueString); } } return md5(sb.toString()).toUpperCase(); } public static String md5 (String value) MessageDigest md = null ; try { byte [] data = value.getBytes("utf-8" ); md = MessageDigest.getInstance("MD5" ); byte [] digestData = md.digest(data); return toHex(digestData); } catch (NoSuchAlgorithmException e) { e.printStackTrace(); return null ; } catch (UnsupportedEncodingException e) { e.printStackTrace(); return null ; } } public static String toHex (byte input[]) if (input == null ) { return null ; } StringBuffer output = new StringBuffer(input.length * 2 ); for (int i = 0 ; i < input.length; i++) { int current = input[i] & 0xff ; if (current < 16 ) output.append("0" ); output.append(Integer.toString(current, 16 )); } return output.toString(); } }
RC4算法
【密码学】RC4加解密原理及其Java和C实现算法
RC4加密解密算法原理与完整源代码实例演示
RC4加密算法
加密原理
1
2
3
4
5
6
7
8
9
10
11
12
13
14
15
16
17
18
19
20
21
22
23
24
25
26
27
28
29
30
31
32
33
34
35
36
37
38
39
40
41
42
43
44
45
46
47
48
49
50
51
52
53
54
55
56
57
58
59
60
61
62
63
64
public class RC4 public static void main (String[] args) RC4 rc4 = new RC4(); String plaintext = "helloworld" ; String key = "key" ; String ciphertext = rc4.encrypt(plaintext, key); String decryptText = rc4.encrypt(ciphertext, key); System.out.println("明文为:" + plaintext); System.out.println("密钥为:" + key); System.out.println("密文为:" + ciphertext); System.out.println("解密为:" + decryptText); } public String encrypt (final String plaintext, final String key) Integer[] S = new Integer[256 ]; Character[] keySchedule = new Character[plaintext.length()]; StringBuffer ciphertext = new StringBuffer(); ksa(S, key); rpga(S, keySchedule, plaintext.length()); for (int i = 0 ; i < plaintext.length(); ++i) { ciphertext.append((char ) (plaintext.charAt(i) ^ keySchedule[i])); } return ciphertext.toString(); } public void ksa (Integer[] s, String key) for (int i = 0 ; i < 256 ; ++i) { s[i] = i; } int j = 0 ; for (int i = 0 ; i < 256 ; ++i) { j = (j + s[i] + key.charAt(i % key.length())) % 256 ; swap(s, i, j); } } public void rpga (Integer[] s, Character[] keySchedule, int plaintextLength) int i = 0 , j = 0 ; for (int k = 0 ; k < plaintextLength; ++k) { i = (i + 1 ) % 256 ; j = (j + s[i]) % 256 ; swap(s, i, j); keySchedule[k] = (char ) (s[(s[i] + s[j]) % 256 ]).intValue(); } } public void swap (Integer[] s, int i, int j) Integer mTemp = s[i]; s[i] = s[j]; s[j] = mTemp; } }